VOMS Admin administrator's guide
VOMS Admin VO administrator guide
For VOMS Admin server 3.5.2, VOMS Admin client 2.0.19
Table of contents
- Introduction
- Managing user requests
- Managing groups
- Managing roles
- Managing Generic Attributes
- Managing user information
- Acceptable Usage Policies management
- The Audit Log new
- Authorization management
- The configuration info page
Other VOMS Admin guides
Introduction
In VOMS, a Virtual Organisation (VO) is a named container for a set of VO
members organized in groups. As an example, the atlas VO at CERN has 3000
registered users and 70 groups.
VOs are managed by one or more VO administrators, i.e. privileged users that are responsible for defining the VO structure (groups, roles, attribute classes), approve user requests and perform other administrative tasks.
This guide is targeted at VO administrators. It introduces the main VOMS administration concepts and functions.
Managing user requests
VO administrators are responsible of managing user requests. User requests can be of the following types:
- VO membership requests, i.e., VO registration requests
- Group membership requests, i.e., requests issued to be added to a VO group
- Role assignment requests, i.e., requests issued to be assigned a given VOMS role
- Certificate requests, i.e., requests to add an additional certificate to a given VOMS membership
- Membership removal requests, i.e. requests to be removed from the VO
All pending requests are shown in the VO administrator home page, shown below:
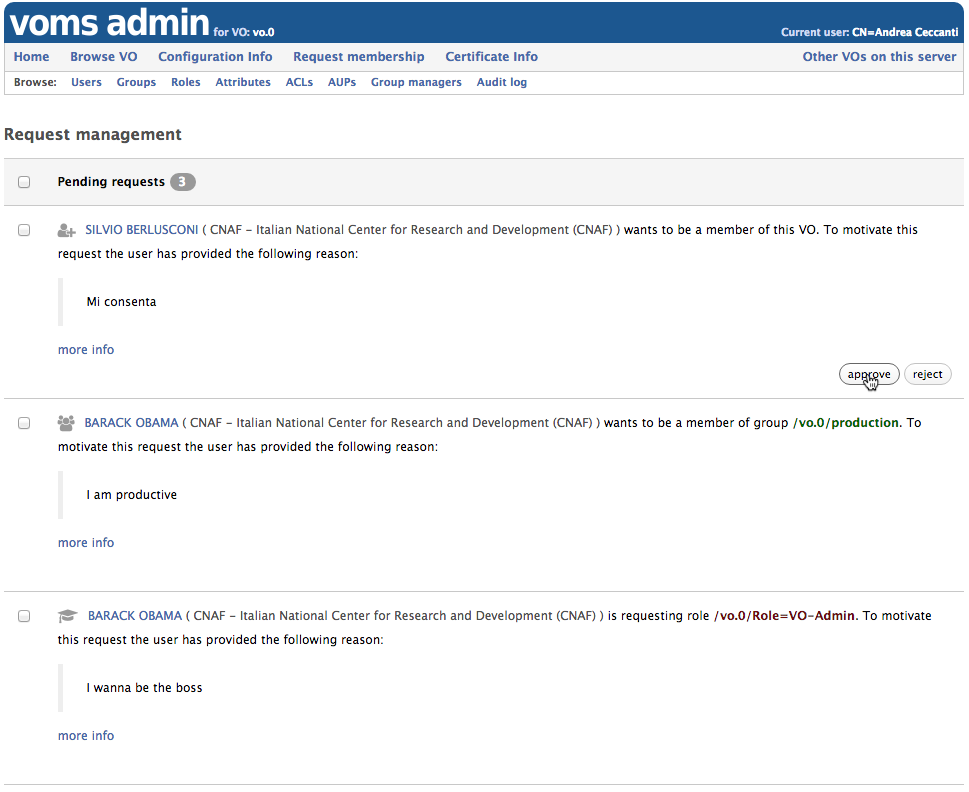
When moving the mouse pointer over a request, the approve and reject buttons appear to approve/reject each request.
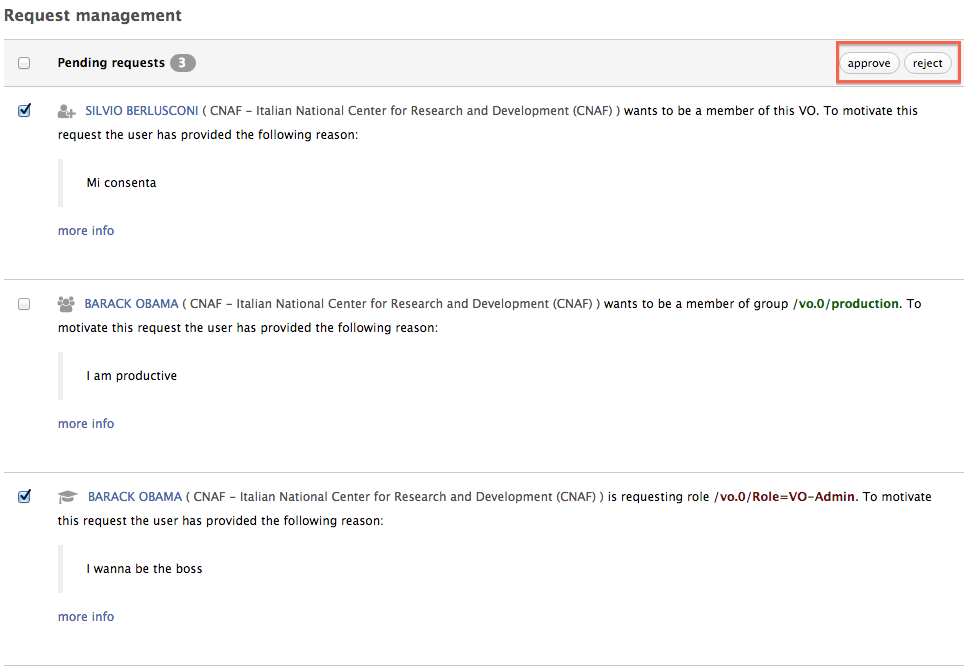
It is also possible to approve/reject multiple requests with a single click, by selecting them and then approve/reject them with the buttons in the upper right corner of the request table:
The Group-Manager role
Starting with version 3.4.0, VOMS Admin provides support for a VOMS role called ‘Group-Manager’, which, when assigned to a VO member in the context a group, grants privileges to manage group and role requests for such group. The ‘Group-Manager’ role is inactive by default, but its inherent privileges are activated automitcally simply by creating a role with its name in VOMS Admin.
To enable the ‘Group-Manager’ role:
-
Create the ‘Group-Manager’ Role (see managing roles). If the ‘Group-Manager’ role already exists for the VO, and has a different meaning and use, a custom name for the ‘Group-Manager’ role can be configured. See [VOMS Admin service administrator][service-admin-guide] for details.
-
Assign the Group-Manager role to those users that will serve as Group managers in the context of the managed group and in the root group context
Note that the Group-Manager role does not grant privileges to approve VO registration requests or to add VO members to a specific group, but only to approve/reject group and role membership request for the managed group.
Group managers
Group Managers provide a way to:
- Allow the user to select which VO administrator will be informed of his VO registration request
- Route all group requests for a given group to a list of administrators, instead of notifying all administrators that have the right to handle the request
Managing group managers
Group managers can be managed following the “Group Managers” link in the Browse navbar.

Group managers:
- can be created only when the VO has more than one group
- can be linked to an existing VO group
- can manage more than one group
Managers are still authenticated through X.509 certificates and authorized using the VOMS ACLs, so ensure that a valid entry is present in the ACLs granting all the required permissions for each Group Manager defined.
Setting up ACLs for Group Managers
Each Group manager should have least the following permissions:
REQUEST_READ REQUEST_WRITE
on the VO root group and in the group they manage.
For more information on ACLs see the Managing authorization.
Managing groups
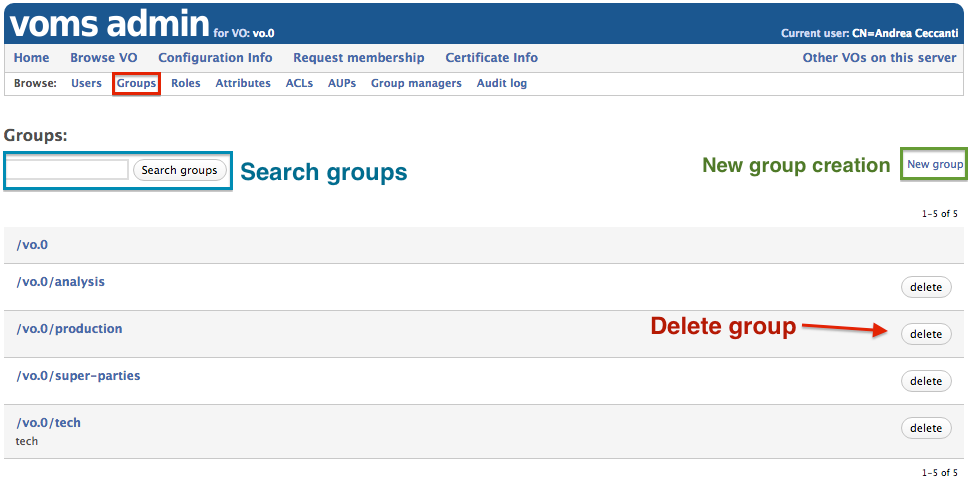
VO groups can be created and deleted from the “Groups” management page, that can be reached by clicking the “Browse groups” link in the VOMS admin browse navbar:
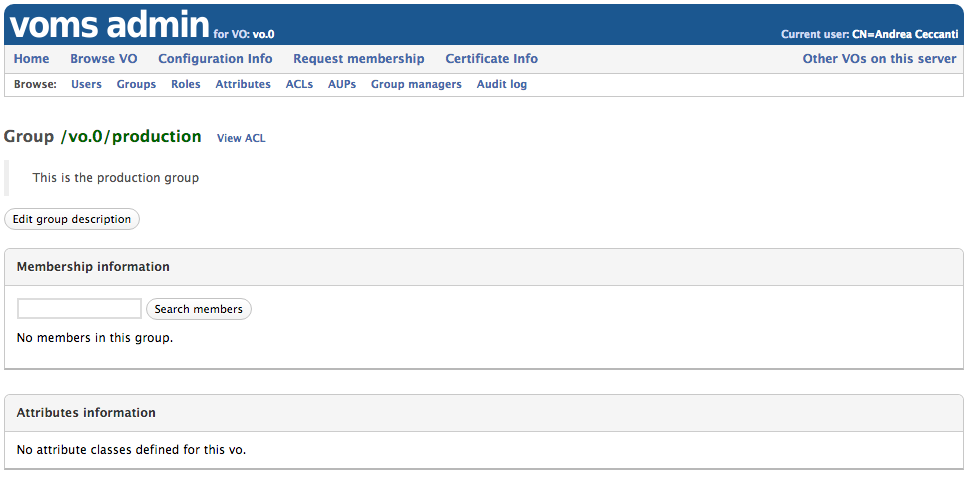
The Group information page
Clicking on the group name in the “Browse groups” page leads to the “Group information” page, where information about description, membership and attributes defined at the group level can be accessed.
- For more information regarding ACLs and VOMS Admin authorization, see the Authorization management section
- For more information regarding Generic Attributes management, see the Managing attributes section
Managing roles
VO roles can be created and deleted from the “Roles” management page, that can be reached by clicking the “Browse roles” link in the VOMS Admin browse navbar:
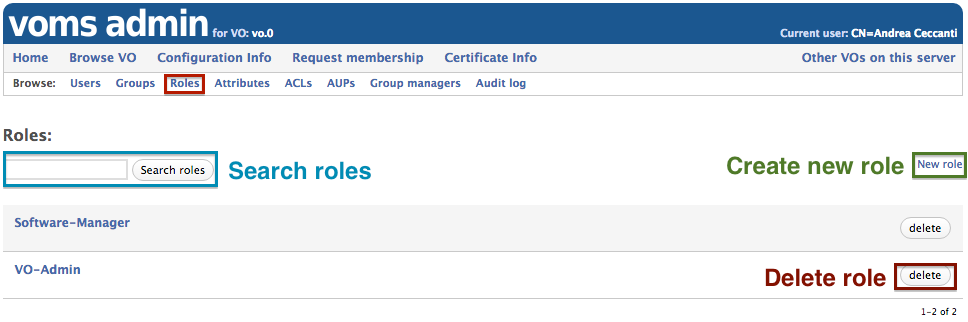
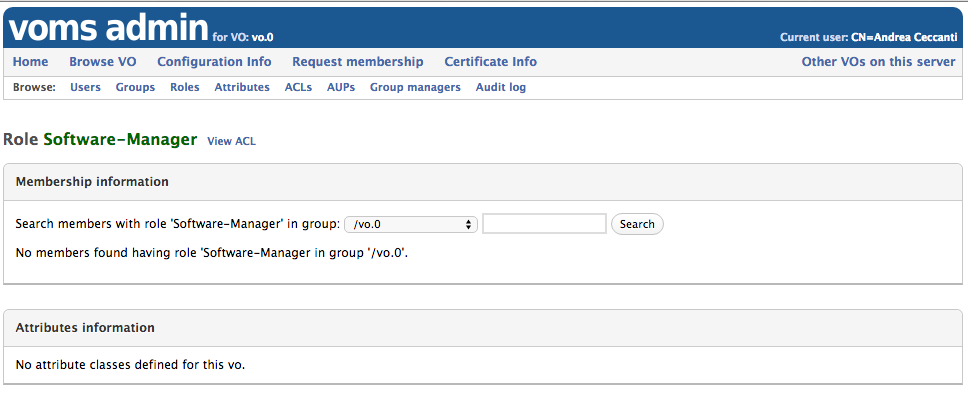
The Role information page
Clicking on the role name in the “Browse roles” page leads to the “Role information” page, where information about role membership and attributes defined at the role level can be accessed.
- For more information regarding ACLs and VOMS Admin authorization, see the Authorization management section
- For more information regarding Generic Attributes management, see the Managing attributes section
Managing Generic Attributes
Generic attributes (GAs) are (name, value) pairs that that can be assigned to VO users. This information will then be encoded in the VOMS Attribute Certificate issued by the VOMS server as a result for a voms-proxy-init request.
GAs extend the range of attributes that VOMS can issue besides Fully Qualified Attributes Names (FQAN), which is a fancy name for VOMS groups and roles, to allow VOMS to issue any kind of VO membership information that can be expressed as (name, value) pairs. Such information can then be leveraged by VOMS-aware applications to take authorization decisions.
For their nature, GAs are issued to VO users. VOMS however provides a way to quickly assign GAs to all the VO members that belong to a specific VOMS group or that are assigned a specific VOMS role within a group. For this reason, you find GA management in user, group and role management pages in VOMS Admin.
To assign GA to users, the VO admin must first create the corresponding Attribute Class. The Attribute Class is used to define:
- the name of the attribute
- a description for the attribute class
- whether VOMS Admin should also enforce value uniqueness, so that the same GA value cannot be assigned to distinct VO members.
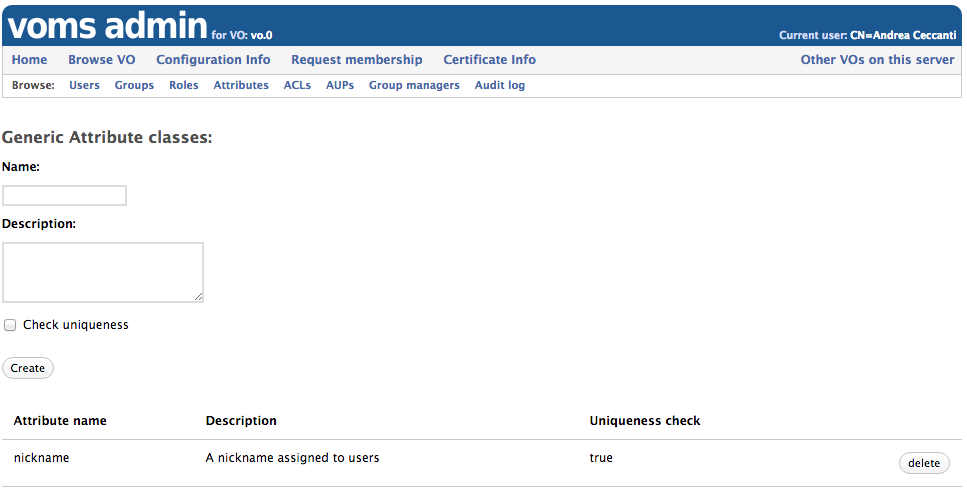
Attribute class management
The “Attribute classes” management page can be reached by clicking on the “Attributes” link in the navbar, and then clicking on the “Manage attribute classes” link.
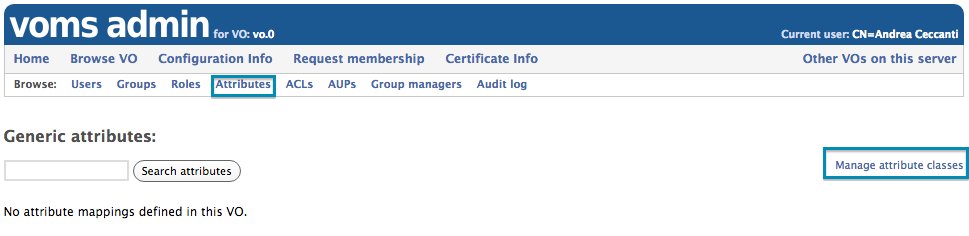
GA classes can then be created, specifying the GA name, description and whether uniqueness must be enforced on the GA values assigned directly to users.
Assigning generic attribute to users, groups and roles
Once a GA class has been created, GA values can be assigned to users, groups and role within groups.
As mentioned above, when one GA is assigned directly to a user, the (name,value) couple is added by VOMS to the attribute certificate returned to user. GAs are assigned to users from the “Generic Attributes” panel in the User information page.
When a GA is assigned to a group, or role within a group, such (name, value) pair ends up in the Attribute Certificate of all the VO members belonging to that group (or that have such role within a group). GAs are assigned to groups and roles from the “Generic Attributes” panel in the Group information or Role information pages.
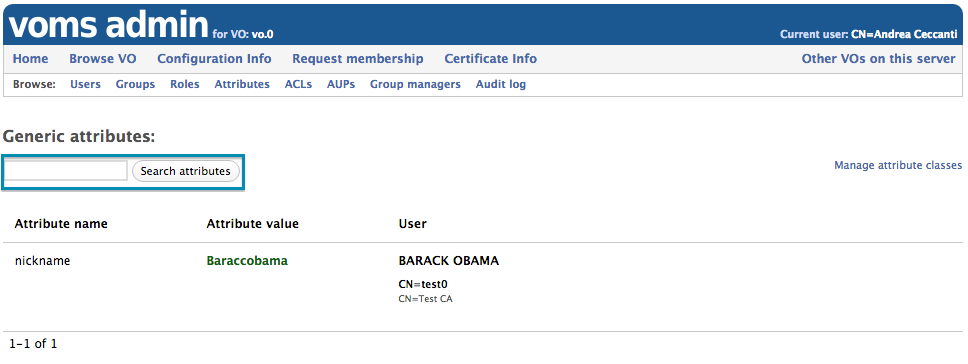
Search attribute assigned to users
VOMS Admin implements search over user generic attribute values assigned to users, from the “Browse Attributes” page.
Managing user information
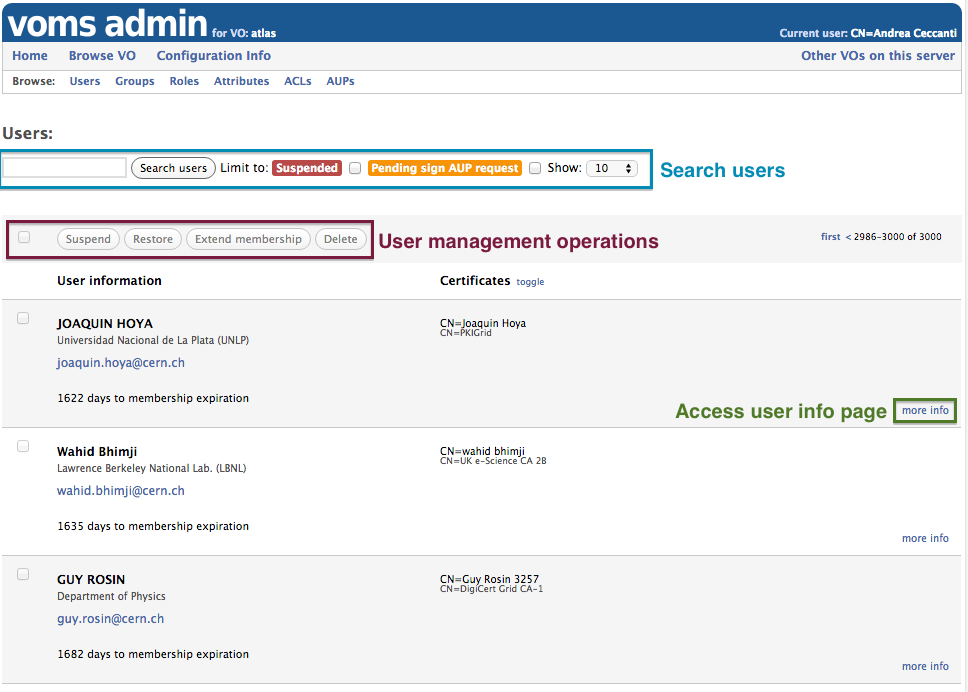
The Browse users page
The Browse users page provides the following functionality:
- Search users, with filters to limit the matches to suspended users or users that are requested to sign the AUP
- Suspend/restore multiple users
- Delete multiple users
- Extend membership for some users
- Access the user information page for a given user
The screenshot below shows the “Browse users” page for a WLCG VO:
The user information page
The “User Information” page gives detailed information about a VO member and provides the administration functionalities to:
- suspend/restore the VO member
- manage the VO member personal information
- assign the member to groups and roles
- manage the VO member certificates
- show information about AUP signatures
- request AUP signature from the user
- sign the AUP on behalf of the user
- change the CERN HR id for the user (only applicable for CERN WLCG VOs)
To reach the user information page for a given VO member, click the “more info” link for a given member from the “Browse users” page, as shown below:
Suspending a VO member
Suspended members are legitimate members of of the VO, but cannot obtain VOMS attribute certificates from the VOMS server.
To suspend a single user, go to the User information page and click the “Suspend this user” button.
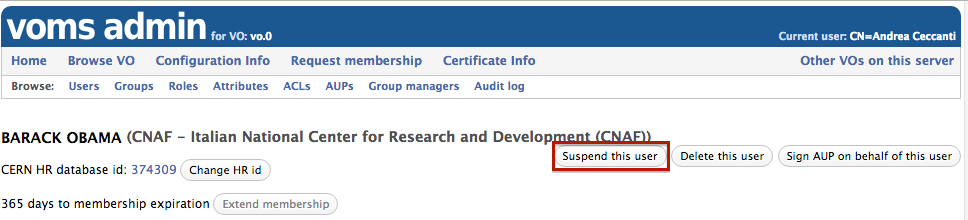
The Browse users page provides a way to suspend multiple users with a single click.
Manage the VO member personal information
The VO admin can change personal information linked to a VO membership through the “Personal information” panel in the User information page.
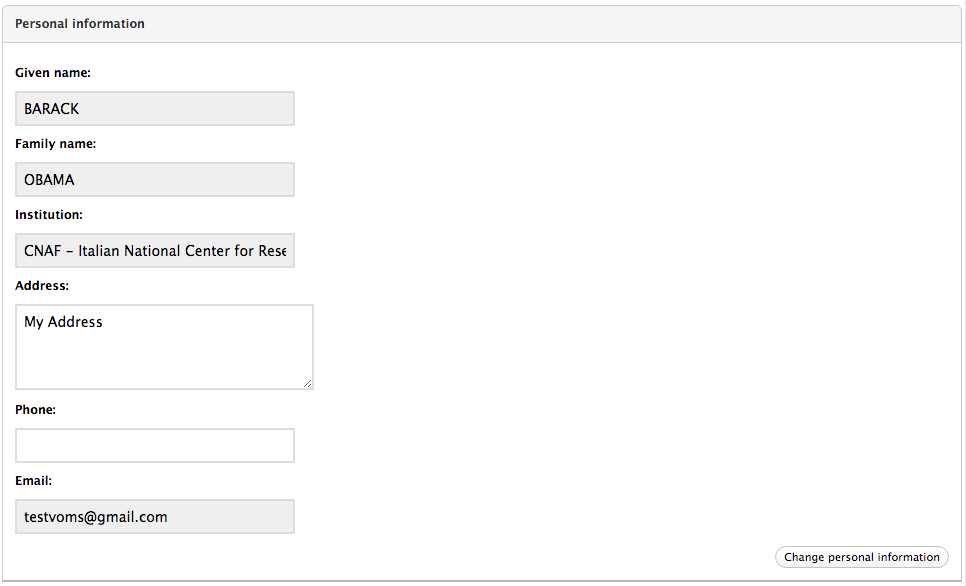
For WLCG VOs some fields cannot be changed as the member personal information is synchronized with the contents of the CERN Human Resource database.
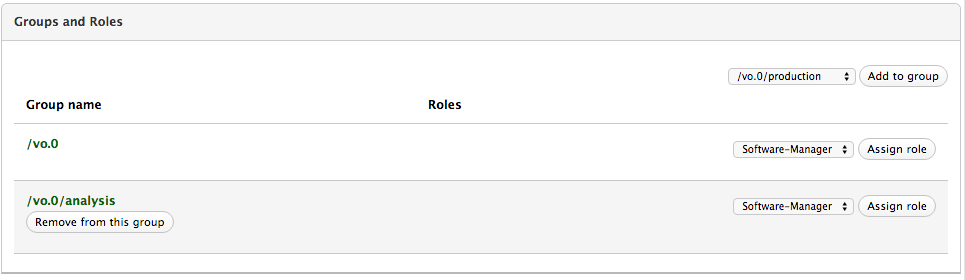
Assign the VO member to groups and roles
The “Groups and roles” panel in the User information page provides the ability to add the VO member to VO groups and assign him VO roles.
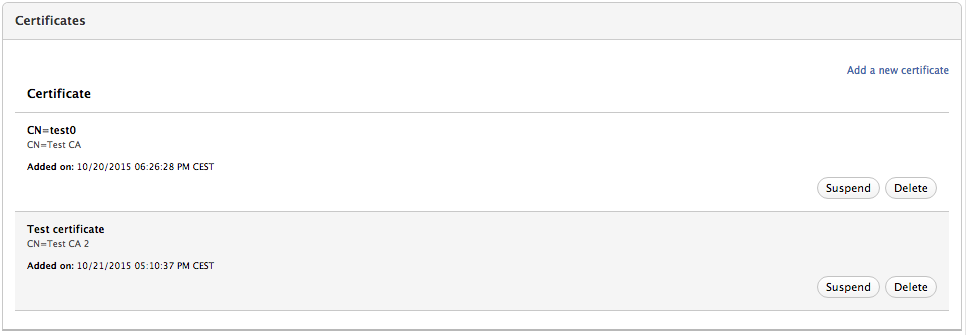
Manage the VO member certificates
The “Certificates” panel in the User information page provides the following functionality:
- add an additional certificate linked to the VO membership
- remove a certificate linked to the VO membership (if more than one are listed)
- suspend a certificate linked to the VO membership
Show information about AUP signatures
For general information about AUP management, see the AUP management section.
The “AUP acceptance status” panel in the User information page provides the following functionality:
- shows when the AUP was last signed by the user, and when the signature will expire
- provides the ability to request a new AUP signature from the user, with the “Request AUP reacceptance” button

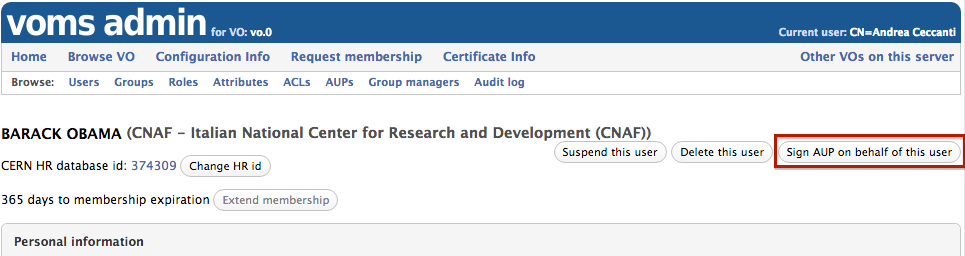
The “Sign AUP on behalf of the user” button at the top of the User information page allows a VO admin to sign the AUP on behalf of a user.
Change the CERN HR id for a VO member (WLCG CERN VOs only)
The “Change HR id” button, at the top of the User information page, allows to change the CERN Human Resource identifier linked to a VOMS membership.

The HR id entered will be validated by VOMS to check if a valid membership for the experiment linked to such id and the currently managed VO is found in the HR database. If the check succeeds, the membership information will be synchronized with the content of the HR membership record at the next run of the VOMS HR database synchronization task.
Acceptable usage policy (AUP) management
For security and policy reasons, VO members are request to comply and accept periodically an Acceptable Usage Policy (AUP) document managed by VO administrators that describes the policy that regulates access to resources shared under the auspices of a VO.
VOMS Admin supports this implementing AUP management and keeping track of when users signed a certain version of the VO AUP document. Under the hood, VOMS Admin maintains an acceptance record for each user, that keeps track of which version of the AUP was signed by the user and when.
At any time, there is an AUP document marked as active. This is the document that is presented to VO members that need to sign the AUP, either because their signature has expired or because they are registering for membership in the VO.
The AUP in VOMS Admin has a configurable acceptance period. By default this period is twelve months, so every twelve months each VO member is requested to sign the AUP document in order to be compliant with the VO policy rules. To enforce this constraint, VOMS admin checks each user’s acceptance record against the currently valid AUP acceptance period. If the user AUP signature has expired, the user is notified by email and asked to sign again the AUP.
The user has typically a two weeks grace period (the period duration is configurable) to sign the AUP after his signature has expired. If the user fails to sign the AUP during this grace period, he is automatically suspened by VOMS Admin.
The membership is suspended only until the user signs the AUP following the instructions sent to him by email, or a VO admin signs the AUP on behalf of the user.
Important: no intervention is normally requested from the VO admin to restore the user membership, as the user can restore his membership at any time by just signing the AUP as requested.
The AUP management page
The AUP management page can be reached from the “Browse AUP” link in the browse navbar and provides the following functionality:
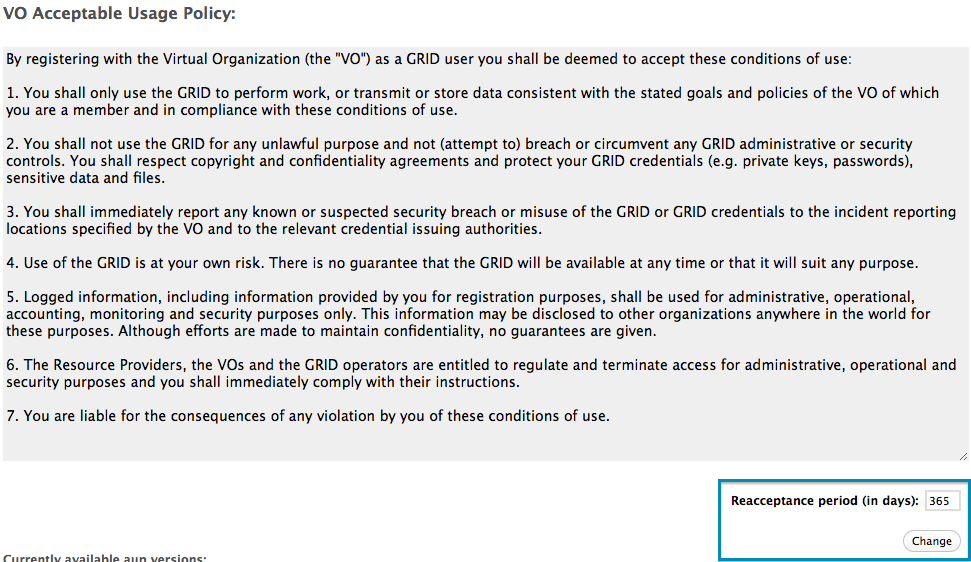
- Show the currently active AUP text
- Change the AUP acceptance period (in days)
- Add a new AUP version
- Delete an AUP version that is not marked as active
- Set the active AUP version
- Trigger acceptance for the active AUP version
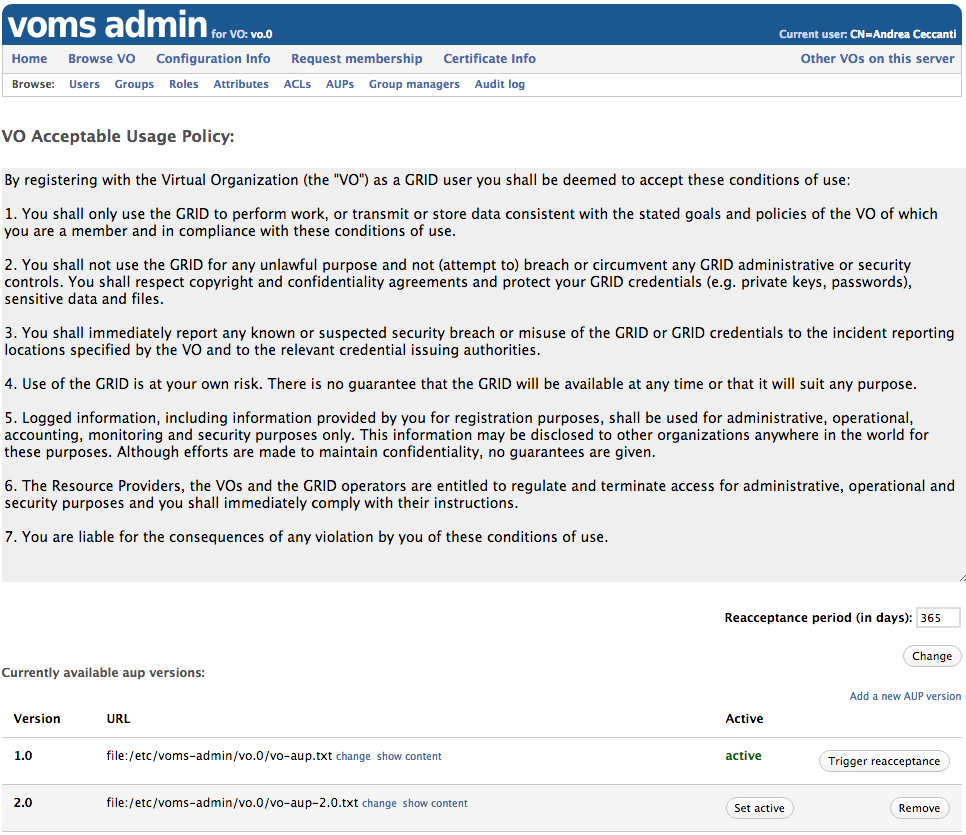
Change the AUP acceptance period
The default acceptance period duration for the VO AUP is 365 days. This period can be changed by VO administrators, using the change acceptance period form highlighted in the screenshot below:
AUP version management
VOMS Admin allows to keep multiple versions of the AUP document. Only one of these versions is marked as active and presented to users for acceptance.
VOMS Admin stores the AUP as URL pointing to a text file. The default AUP is a file residing in the configuration folder on the VOMS Admin server.
When an AUP version is marked as active, all users that do not have a valid acceptance record for that version are requested to sign the AUP.
Add a new AUP version
To add a new AUP version, follow the “Add a new AUP version” link in the “AUP management page”.

Delete an AUP version not marked as active
AUP versions not marked as active can be deleted with the “Remove” button in the “AUP management page”

Set the active AUP version
If multiple versions of the AUP are available, the active version can be changed with the “Set active” button in the “AUP management page.”

Trigger acceptance for the active AUP version
The VO administrator can request a new signature of the AUP from all the VO users with the “Trigger acceptance” button.

The Audit Log
Starting with version 3.4.0, VOMS Admin keeps an audit log of all the actions that change the content of the VOMS database.
The audit log can be accessed by following the “Audit Log” link in the browse navbar.
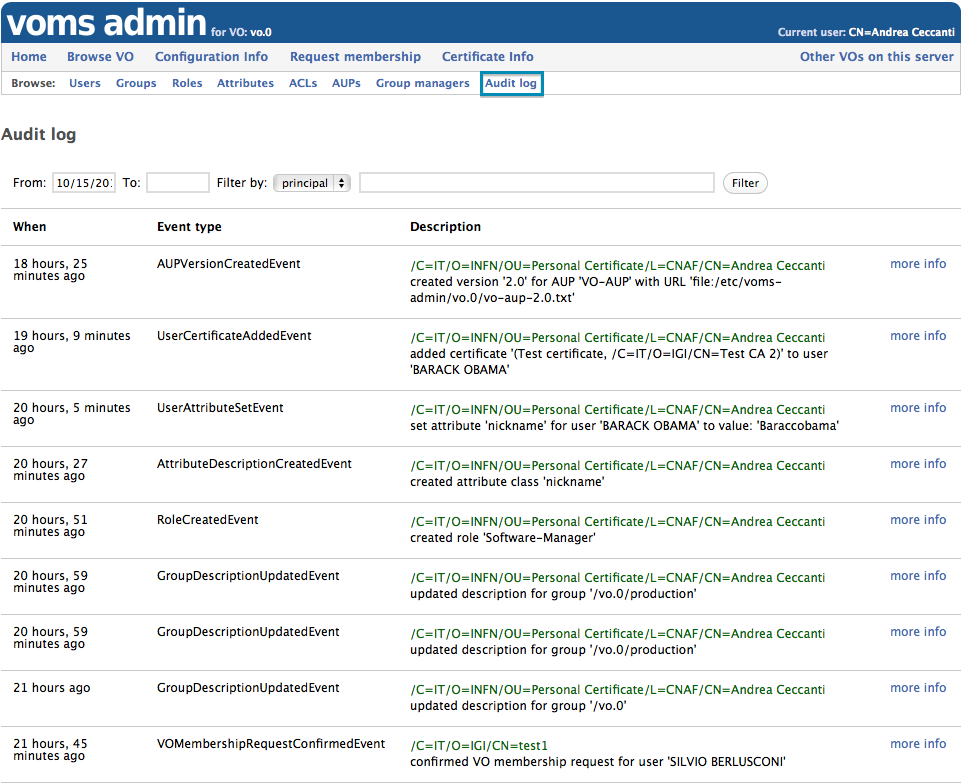
The page shows the last week of records in the audit log. To change the period use the “From” and “To” fields in the record filter bar, which supports filtering by Principal and event type:

The Audit Log record
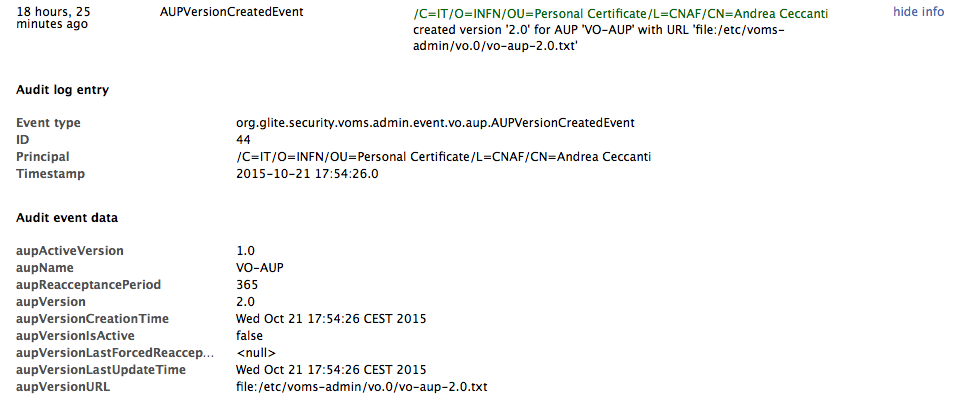
Each audit log record describes an event that changed the contents of the VOMS database, providing the following information:
- The time of the event
- The type of event, i.e., what action was triggered that changed the VOMS database
- The principal, i.e., who triggered the action that changed the VOMS database
- A description of the event
- The event data, i.e., what information has changed in the VOMS database
A compact representation of a log record is shown in the screenshot below:

Clicking the “more info” handle turns on the expanded log record view, which displays the event data in full.
Authorization management
In VOMS-Admin, each operation that accesses or modifies the VOMS database is authorized via the VOMS-Admin Authorization framework.
Authorization policies are expessed as Access Control Lists (ACLs) linked to VOMS groups. ACLs are composed of Access Control Entries (ACEs), which define a mapping between a Principal and a set of VOMS Admin permissions.
A Principal, in the context of an ACE, may be:
- A VO administrator for the VO, identified by the subject of an X.509 certificate
- A VO user
- A VOMS Fully Qualified Attribute Name (FQAN), i.e. any user in the VO who belongs to a certain VO group or role
- Any authenticated user, i.e. any user that presents a certificate issued by a trusted CA
A VOMS Admin Permission is a fixed-length sequence of permission flags that describe the set of permissions a VOMS Administrator has in a specific VOMS group. The following table explains in detail the name, meaning and valid scopes of these permission flags:
 The representation above is equivalent to the following set of permissions
(i.e., all permissions):
- CONTAINER\_READ
- CONTAINER\_WRITE
- MEMBERSHIP\_READ
- MEMBERSHIP\_WRITE
- ACL\_READ
- ACL\_WRITE
- ACL\_DEFAULT
- ATTRIBUTES\_READ
- ATTRIBUTES\_WRITE
- REQUESTS\_READ
- REQUESTS\_WRITE
- PERSONAL\_INFO\_READ
- PERSONAL\_INFO\_WRITE
- SUSPEND
VOMS Admin also shows another more compact representation of a set of
permissions in the [Delete ACE page](#delete-ace-page):
The representation above is equivalent to the following set of permissions
(i.e., all permissions):
- CONTAINER\_READ
- CONTAINER\_WRITE
- MEMBERSHIP\_READ
- MEMBERSHIP\_WRITE
- ACL\_READ
- ACL\_WRITE
- ACL\_DEFAULT
- ATTRIBUTES\_READ
- ATTRIBUTES\_WRITE
- REQUESTS\_READ
- REQUESTS\_WRITE
- PERSONAL\_INFO\_READ
- PERSONAL\_INFO\_WRITE
- SUSPEND
VOMS Admin also shows another more compact representation of a set of
permissions in the [Delete ACE page](#delete-ace-page):
 The representation above is equivalent to the following set of permissions:
- CONTAINER\_READ
- MEMBERSHIP\_READ
- PERSONAL\_INFO\_READ
### ACL inheritance
The representation above is equivalent to the following set of permissions:
- CONTAINER\_READ
- MEMBERSHIP\_READ
- PERSONAL\_INFO\_READ
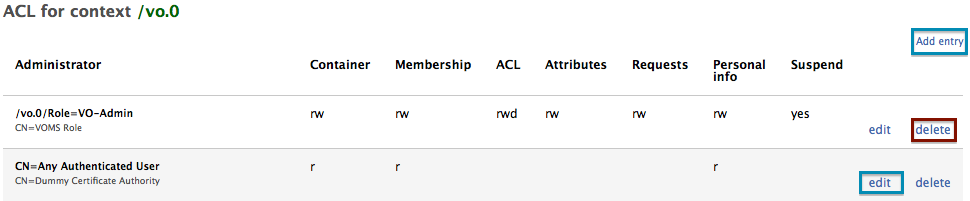
### ACL inheritance 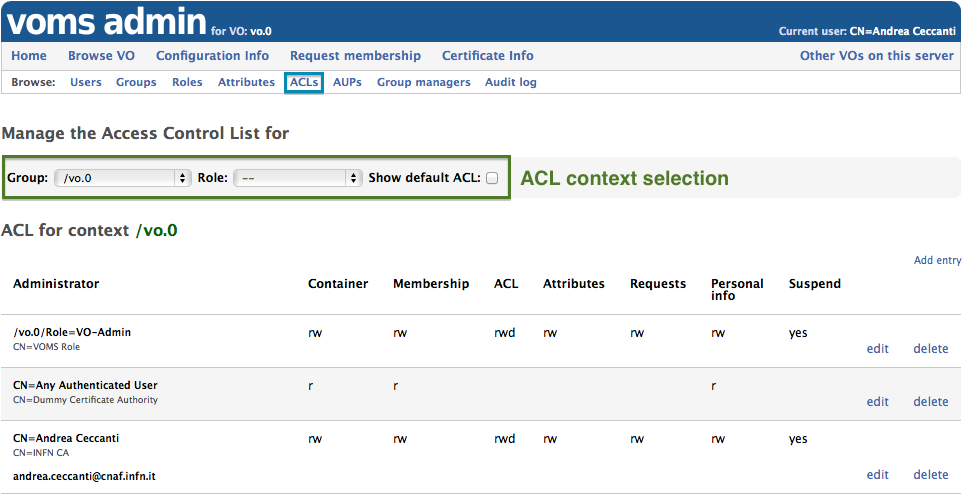 The screenshot above shows the ACL for the `vo.0` root group. The ACL has three entries:
1. The first entry that grants all permissions to anyone with the `/vo.0/Role=VO-Admin`
2. The second entry grants VO browse permissions to any authenticated users
3. The third entry grants all permission to the 'Andrea Ceccanti'
administrator, authenticated with his INFN CA personal certificate
The context can be changed using the ACL context selection form, highlighted in
green in the screenshot above. Default ACLs are shown by clicking on the
"Default ACL" checkbox.
The screenshot above shows the ACL for the `vo.0` root group. The ACL has three entries:
1. The first entry that grants all permissions to anyone with the `/vo.0/Role=VO-Admin`
2. The second entry grants VO browse permissions to any authenticated users
3. The third entry grants all permission to the 'Andrea Ceccanti'
administrator, authenticated with his INFN CA personal certificate
The context can be changed using the ACL context selection form, highlighted in
green in the screenshot above. Default ACLs are shown by clicking on the
"Default ACL" checkbox.
 ##### The Add ACL entry page
 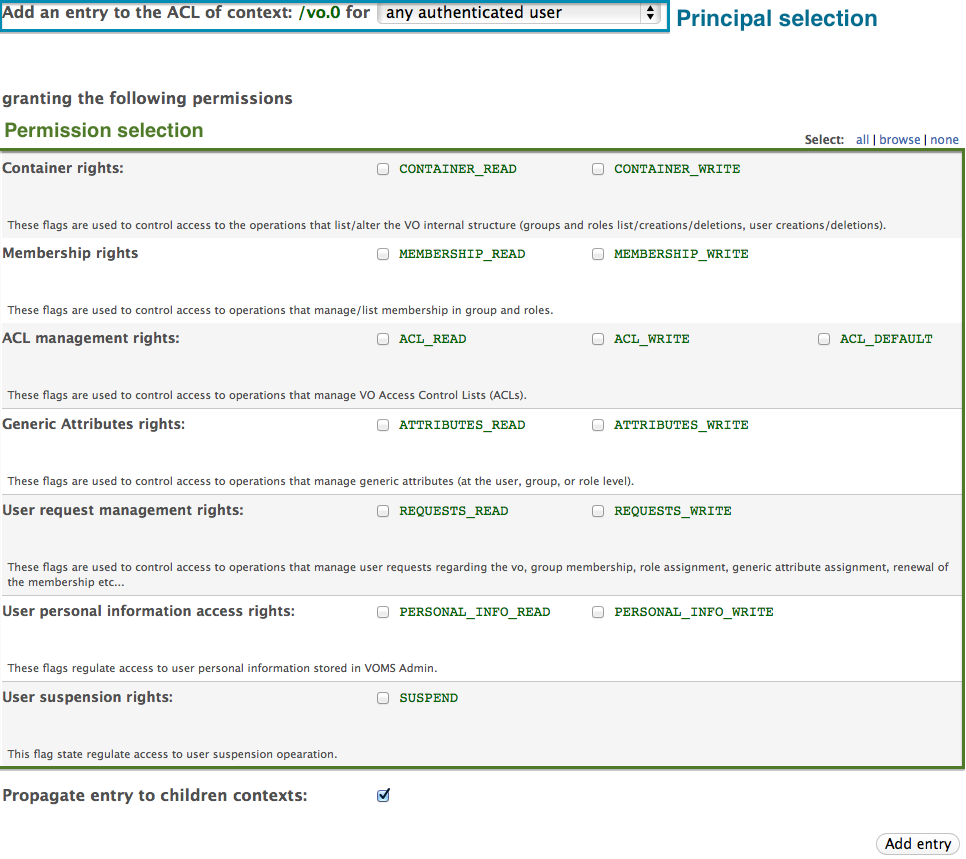 ##### The Delete ACL entry page
  ## The configuration info page
 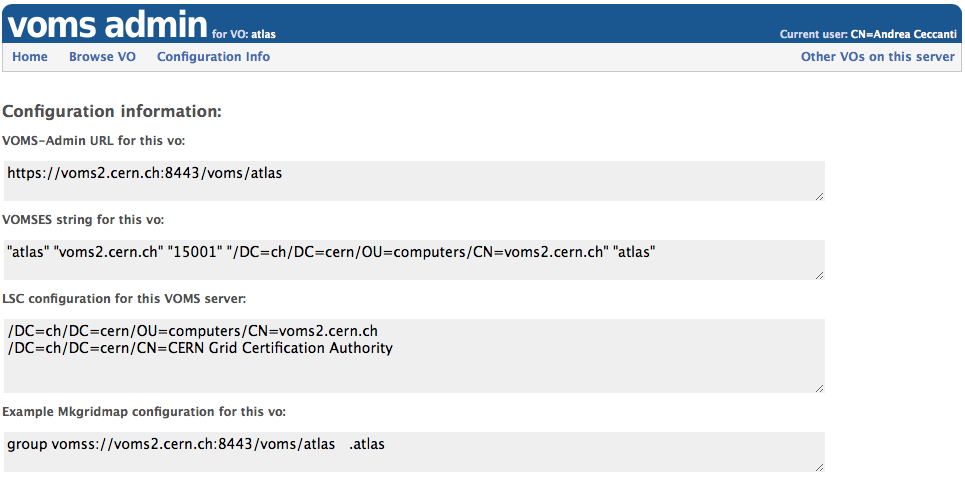 [service-admin-guide]: #theguide